Lido Eth2 Staking Guide
Learn how to stake ETH on Ethereum 2.0s’ Beacon Chain with the Lido staking pool and the Metamask Browser Extension.

Short Intro to Lido
Lido is a liquid staking solution for Ethereum 2.0 that allows ETH holders to stake any amount of ETH without having to operate staking infrastructure or foregoing the liquidity of their funds.
Lido is run as a DAO and deposited ETH are distributed between reputable, industry-leading node operators that are members of the DAO. If you stake via Lidos’ staking pool, you receive “staked ETH” (ERC20 token) that represent your deposited ETH (+ accrued rewards & penalties).
Your deposited ETH remain locked and illiquid until transfers are enabled in phase 1.5 of Ethereum 2.0s’ phased launch. While Lido allows you to transfer, trade, and use your “staked ETH” before the launch of phase 1.5, you can redeem staked ETH for ETH only after transfers are enabled on Ethereum 2.0. “staked ETH” are minted on a 1:1 basis for every ETH staked via Lido and burned once “staked ETH” are redeemed for ETH. You can learn more about how Lido works here.
Guide on how to stake ETH with Lido and Metamask
In this step-by-step guide you will learn how to stake your ETH on Ethereum 2.0s’ Beacon Chain via the Lido staking pool and the Metamask Browser Extension in two simple steps:
- Setup your Eth2 staking operations
- Stake your ETH via Lido and Metamask
Using Lido with Metamask allows you to use a hardware wallet such as a Ledger Nano device for your staking operations and is highly encouraged as it adds another layer of security. In case you are going to use a Ledger, make sure “Contract data” is allowed. You can allow Contract data in the settings within the Ethereum app on your Ledger device.
Please note that we compiled this guide in the Ethereum Goerli testnet prior to the launch of Lido. However, the process is the same on mainnet. In case you want to familiarize yourself with the process before interacting with mainnet, make sure to change to “Goerli Testnet” within Metamask and visit the Lido Testnet UI. You can request GoerliETH here and here.

Step 1: Setup your Eth2 staking operations
Before you get started, please make sure to have the latest version of the Metamask Browser Extension installed and to have enough ETH in your wallet to cover transaction fees. Furthermore, ensure that Metamask is connected to “Ethereum Mainnet”.
In case you want to use a hardware device for your staking operations, connect Metamask to your device via the Metamask Browser Extension.

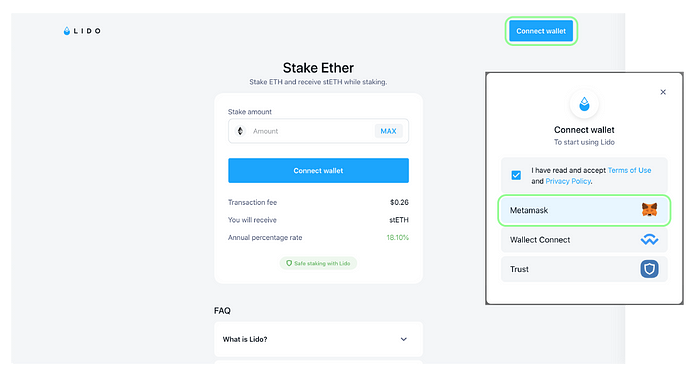
Now visit https://stake.lido.fi/ and click “Connect Wallet”. In case you are using a Ledger, make sure to have the Eth app open on your device before you click “Connect Wallet”.
Check the box at the top of the pop-up window and choose “Metamask”. You might get prompted to unlock Metamask with your password in case it is not already unlocked.
In case you have more Accounts connected to Metamask, open Metamask with the Account you want to use for Lido prior to clicking “Connect Wallet” in the Lido UI.

You are now presented with the main menu of the Lido UI. You can find some FAQs at the bottom of the page, make sure to read them to learn more about Lido and the risks involved in using it. You can always click on your account icon in the upper right corner of the UI to disconnect your account, copy its’ address, or explore it on Etherscan.
This already concludes the setup of your Eth2 staking operations — you are now ready to stake!

Step 2: Stake your ETH via Lido and Metamask
Within the Lido UI, choose the ETH you want to stake via Lido under “Stake Amount”. You can choose any amount of ETH, even less than 32 ETH, which would be required in case you would want to spin up your own validator. Open the Ethereum App on your Ledger, then click “Stake” in the Lido UI to continue.

Confirm the transaction in the Metamask pop-up window. In case you are using a Ledger device, check and sign the transaction on your ledger.
This is the address you should see displayed on your Ledger:
0xae7ab96520DE3A18E5e111B5EaAb095312D7fE84
A confirmation pop-up shows you the success of your transaction as well as your new “staked ETH” balance.

Congratulations, you are now officially staking on Ethereum 2.0s’ Beacon Chain via Lido and are contributing to the security and decentralization of the network!
In case you deposit more than 32 ETH, your ETH are distributed in chunks of 32 ETH between professional node operators that are members of the LidoDAO.
Using your staked ETH
One benefit of using Lido is that it allows you to transfer, trade, and use your staked ETH while your ETH remain locked and illiquid until phase 1.5 of Ethereum 2.0s’ phased rollout.
To make use of this, you need to add staked ETH to your Metamask Browser Extension. Open Metamask, click “Add Token”, and then switch to the “Custom Token” tab. Input the following information, click “Next” and then “Add Tokens”.
Contract address: 0xae7ab96520de3a18e5e111b5eaab095312d7fe84
Decimals: 18

You can find “staked ETH” in the “Assets” tab on Metamask. Click on them in case you want to put them to use, e.g. send them to someone. Please note that when you spend your “staked ETH” you will not be able to redeem the full amount of ETH you deposited!

Resources
In case you want to learn more about Lido, we highly recommend checking out these resources:
Lido Website
Lido Staking Widget
‘How Lido Works’ Explainer
Lido Telegram
Let’s connect
We hope that we could help you stake your ETH with this guide. In case you have any questions, need more assistance, or simply want to chat, always feel free to reach out to us via Telegram, eMail, Twitter, or LinkedIn!
